Grout Cleaning

Welcome to my Work History archive where you will find detailed examples of the cleaning and renovation of Grout carried out in North Essex

Cleaning and Renovating Grout

The top layer of grout is porous and can absorb grease, dirt and limescale. Spillages such as wine, lemonades or greasy substances will cause marks and patches in the joints in the floor. Grout between wall-tiles particularly in damp areas like bathrooms will become dirty and unattractive as a result of Mould, Mildew and Limescale.

Mould is one of the most unsightly problems, which usually starts off in the wettest area of the room, this could be the bottom of the shower or bath, then starts to spread and if left unchecked could cover a large area of the wall.

Another common issue we find is a problem known as Grout Haze or Grout Smearing where a thin layer of grout has been left to set on the surface of the tile. Once grout has set it is difficult to remove.

Discolouration of grout joints in bath or shower areas due to continued use of acid formulated shampoos and soaps. This causes yellow orange and pink stains to the grout over even a short period of time. Whilst Grout Joints can be cleaned, badly stained grout may need to be re-coloured.

Protecting your grout in advance with a sealer will prevent most of these issues and although relatively unknown in the UK, protection awareness is growing. Sealing forms an invisible barrier between the grout and the surface, this will then protect your investment for years to come.

We have solutions for all the problems listed above and below you will find detailed examples of work we have carried out in the past to resolve many of these issues. It should give you some idea of what’s involved and what can be achieved with the right techniques and products.


Terracotta Brick Tiled Kitchen floor Renovation Harwich

Terracotta Brick Tiled Floor Deep Cleaned and Sealed in a Harwich Kitchen

This Terracotta Brick tiled floor had been laid in the kitchen of a house in the port town of Harwich less than a year prior. I suspect the floor hadn’t been sealed very well after installation as it was already proving difficult to keep clean and was beginning to mark easily.

Terracotta Brick Tiled Kitchen floor Before Cleaning Harwich

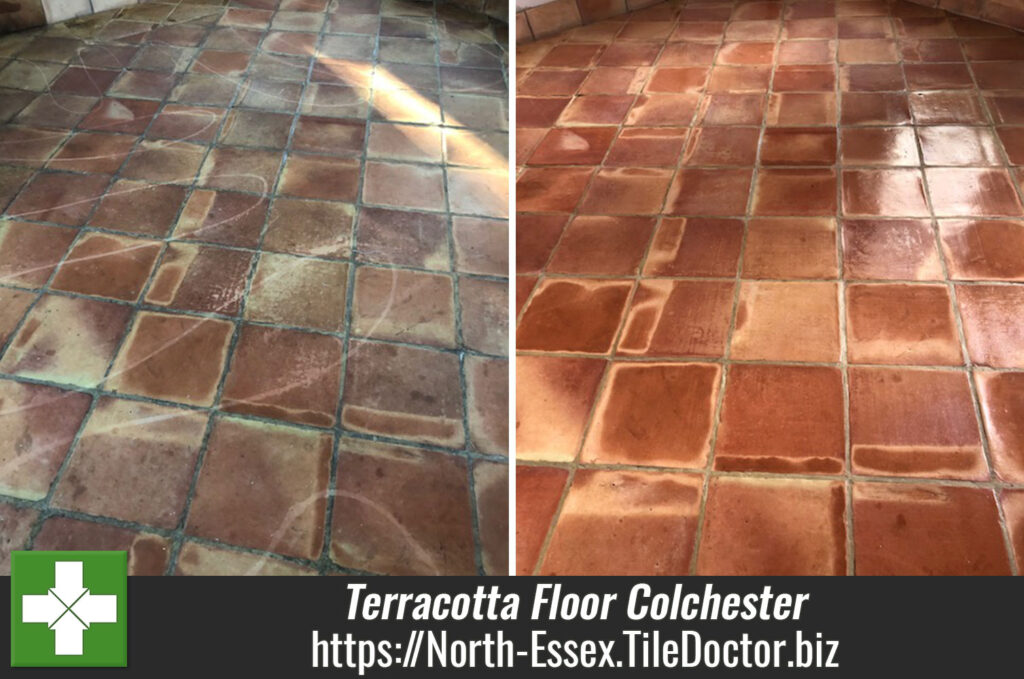
Terracotta is made from clay and as a result a very porous material that needs to be sealed to prevent dirt becoming trapped in its pores. Sealing keeps the dirt on the surface where it can be easily cleaned away. I recommended giving the floor a deep clean to remove dirt ingrained dirt from the pores of the bricks and then sealing with a stronger product that could take some wear. Kitchens are after all one of the busiest rooms in the house.

Happy with my quote a date was agreed for the work to start and the products needed were ordered in time for my arrival.

Cleaning a Brick Terracotta Kitchen Floor

To get the brick tile and grout clean I sprayed the floor with a strong dilution of Tile Doctor Pro-Clean and left it to soak in for ten minutes. The dwell time is important as it gives the product time to start breaking down old sealers and ingrained dirt.

The next step was to run a black scrubbing pad fitted to a rotary machine over the floor which in turn with the Pro-Clean lifts out the dirt to the surface. The pads can struggle to get into the recesses of the grout lines and along the edges so I like to follow this up with a handheld scrubbing brush.

The floor was rinsed with clean water to remove all the dirt and soiling using a wet vacuum. I carried out an inspection of the floor at this point looking for stubborn marks and staining and then re-treated those areas to a spot clean using the same process.

I used a full litre of Pro-Clean on the floor getting it clean and then once satisfied it was as clean as it could be I left it to dry off fully overnight assisted with a couple of down blowers.

Sealing a Brick Tiled Kitchen Floor

Returning on the 2nd day the tiles were tested for moisture using a damp meter to check they were dry enough to accept a sealer. The blowers had done the job and the meter confirmed all was well.

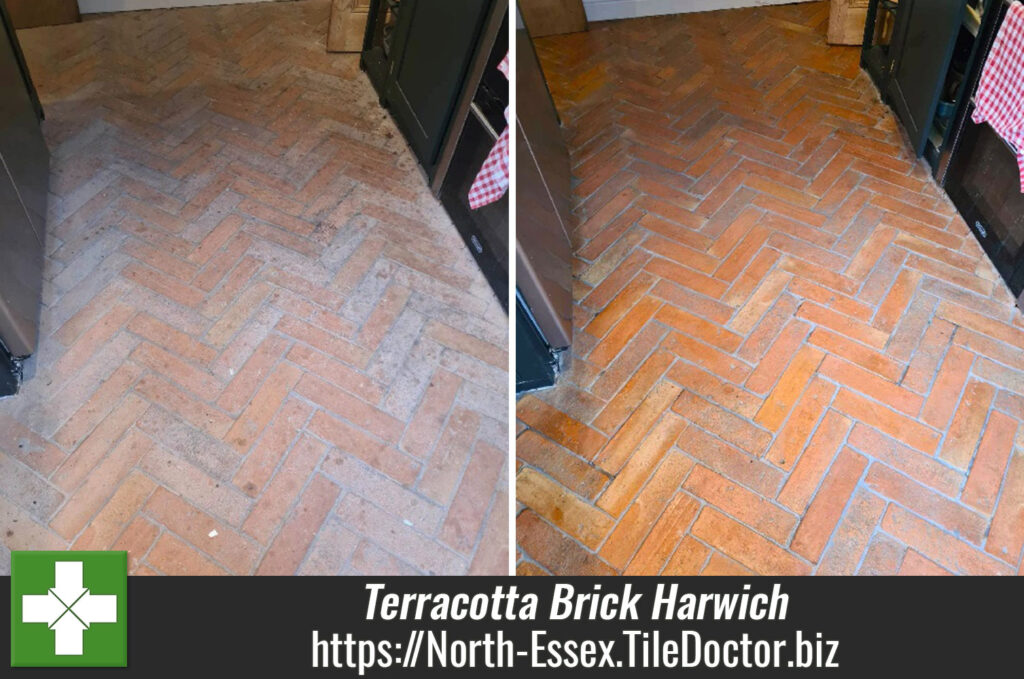
Work then started on sealing the Terracotta bricks using Tile Doctor Seal & Go Extra, this is a modern acrylic based sealer that improves the appearance of the brick tile bringing out the colour. Terracotta is as mentioned earlier quite a porous material so it took the application of five coats to fully seal the floor, fortunately it was only a small area so only 1 litre of sealer was needed.

Terracotta Brick Tiled Kitchen floor After Cleaning Harwich

The work made a big improvement to the appearance of the floor and what was once a dull almost grey herringbone pattern brick floor is now a colourful attractive feature that will prove much easier to keep clean.

For aftercare cleaning I recommended the use of Tile Doctor Neutral Tile Cleaner, which is a mild but effective, neutral ph cleaner. We recommend this as many of the products you find in supermarkets are simply too strong and bleach based which will slowly strip off the sealer and allow dirt back into the floor.


Professional Restoration of a Brick Tiled Kitchen Floor in Essex

Terracotta Brick Tiled Floor Deep Cleaned and Sealed in a Harwich Kitchen Read More »

Terracotta Tiled Floor Deep Cleaned and Sealed in Wivenhoe Essex

Blending New and Old Terracotta Floors Tiles in Wivenhoe Colchester

This Terracotta tiled floor with Black tomettes was installed in the kitchen of a house in the town of Wivenhoe, south of Colchester. The floor had been partly replaced due to a water leak and the difference between the new and original was noticeable. Unhappy with the appearance the owner contacted me to see if anything could be done.

Terracotta Tiled Kitchen Floor Before Cleaning Wivenhoe Terracotta Tiled Kitchen Floor Before Cleaning Wivenhoe

I visited the property to survey the Terracotta floor and I could see solution would be to deep clean the whole floor, including the Grout and then reseal with a sealer that would bring out the beauty in the tile and give both sections the same appearance. Happy to proceed with my plan we scheduled a date for the work to be done a few weeks later.

Terracotta Tiled Kitchen Floor Before Cleaning Wivenhoe

Cleaning a Terracotta Tiled Kitchen Floor

Cleaning started with the spraying the Terracotta floor with a dilution of Tile Doctor Pro-Clean which is our go to tile and grout cleaning product. After spraying onto the tile and grout it is then then left to soak in for around ten minutes before being scrubbed in using a rotary machine fitted with a black scrubbing pad. This process removed the many years of dirt that had built up in the original floor and got both areas clean to the same standard. Two litres of Pro-Clean was used during this process and a wet vacuum was used to extract the soiling and water used to rinse the floor after scrubbing. Pro-Clean is an alkaline product so once satisfied the floor was clean it was given a good rinse with water and further extraction to neutralise the pH of the floor after cleaning.

Sealing a Terracotta Tiled Kitchen Floor

The floor was left to dry out overnight and after checking moisture levels the following day it was sealed with five coats of Tile Doctor Seal & Go which is a water-based sealer that adds a subtle sheen finish. Terracotta being made from clay is very porous and so absorbed two litres of sealer before it was fully sealed and protected from ingrained dirt.

Terracotta Tiled Kitchen Floor After Cleaning Sealing Wivenhoe

The new sealer did a great job of blending in the appearance of the new and old Terracotta floor and will make future cleaning much easier. Speaking of which, I recommend using Tile Doctor Neutral Tile Cleaner for regular cleaning, it’s a pH neutral tile cleaning product that can be used daily if required. It’s a mild cleaning product that won’t strip the tiles of the newly applied sealer like many strong household cleaners can. It’s also concentrated so a small amount goes along way.

Terracotta Tiled Kitchen Floor After Cleaning Sealing Wivenhoe Terracotta Tiled Kitchen Floor After Cleaning Sealing Wivenhoe


Professional Renovation of a Terracotta Tiled Kitchen Floor in Essex

Blending New and Old Terracotta Floors Tiles in Wivenhoe Colchester Read More »

Bleach Stained Terracotta Kitchen Floor Renovated in Colchester

Bleached Stained Terracotta Tiled Kitchen Floor Renovation in Colchester

The owner of this property in Colchester got in touch to have their Terracotta Kitchen floor tiles renovated after they were marked with bleach. If you look closely at the before pictures you will see the terracotta tiles have white lines running across them.

Terracotta Tiled Kitchen Floor Before Cleaning Colchester Essex

Intrigued, I arranged to visit the property and take a look at the problem. I suspect the Terracotta had been protected with some sort of sealer and the bleach being very acidic had basically cut through it leaving the conspicuous lines in the floor.

Terracotta Tiled Kitchen Floor Before Cleaning Colchester Essex

I was very confident that the floor could be deep cleaned and once a fresh seal had been applied the problem would be resolved and the tiles would look great. My client was happy to go ahead with the quotation and we arranged a mutually convenient time to carry out the renovation.

Deep Cleaning a Terracotta Tiled Kitchen Floor in Colchester

First, I applied tape to all the the plinths and around the doorways to protect the wood from the cleaning products we would be using. To get the tiles clean a strong dilution of Tile Doctor Pro-Clean was sprayed on to the tiles and left to soak in for roughly ten minutes. This dwell time allows time for the cleaner to breakdown the old sealer and ingrained dirt so its can be removed easier.

Next a Black scrubbing pad was fitted to a rotary buffing machine and was slowly worked over the floor to scrub the solution into the Tile and Grout to release years of dirt. More Pro-Clean was scrubbed in along the grout lines with a stiff brush to get them clean. In total two litres of Tile Doctor Pro Clean was used during the cleaning.

The cleaning solution went black with the dirt and the soiling was rinsed with water and extracted using a wet vacuum. Rinsing with water helps to neutralise any remaining cleaning solution and the wet vacuum is used to get the floor as dry as possible. At this point the floor looked a whole lot better and was left to dry out overnight.

Sealing a Terracotta Tiled Kitchen Floor in Colchester

The following morning, I used the damp meter to check the floors moisture readings and I was pleased to see the readings were acceptable and the tiles could be sealed. If the floor was still damp the seal would not cure properly so this is an important step.

Terracotta is a porous material so four coats of sealer were applied allowing each coat to dry before applying the next. On this floor I used Tile Doctor Seal & Go Extra which is a water-based sealer manufactured using a special acrylic-based formula that leaves a subtle sheen, Terracotta is quite a porous material so two litres of sealer were used in total.

Terracotta Tiled Kitchen Floor After Cleaning Colchester Essex

Once complete the tiles looked much lighter and cleaner with no staining. Additionally, the new sealer will make the floor easy to maintain and my client was very pleased with the transformation.

On the topic of maintenance, I recommended they use Tile Doctor Neutral Tile Cleaner to clean the floor. It is a pH neutral product which will not compromise the newly applied seal, which can be the problem with many household cleaning products which are simply too strong for use on a sealed floor. This will ensure the longevity of the seal and will make the floor easy to maintain which is of course a bonus.

Terracotta Tiled Kitchen Floor After Cleaning Colchester Essex


Professional Restoration of a Terracotta Tiled Kitchen Floor In North Essex

Bleached Stained Terracotta Tiled Kitchen Floor Renovation in Colchester Read More »

Terracotta Tiled Kitchen Floor Before and After Renovation Bishop Stortford Essex

Terracotta Tiled Kitchen Floor Clean and Seal in Bishop Stortford

We had a request to visit a beautiful Barn conversion on the Essex side of the market town of Bishop Stortford, the lady of the house was concerned about her Terracotta tiled Kitchen Floor which was dirty and had become difficult to maintain.

Terracotta Tiled Floor Before Clean and Seal in Bishop Stortford

After taking look I could see that the sealer had worn down and was no longer preventing dirt from becoming ingrained in the pores of the Terracotta tile. This is a common problem with Terracotta which needs a sealer in place if you want to keep the floor looking its best. I recommended we strip off what was left of the old sealer, give the floor a thorough clean and then re-seal it over the course of two days. As it turns out the floor had not been cleaned and resealed in ten years, so my client was happy for me to do the work.

Terracotta Tiled Floor Before Clean and Seal in Bishop Stortford

Deep Cleaning Terracotta Floor Tiles

The first step was to strip the floor off any remaining sealer using a strong dilution of Tile Doctor Pro-Clean. The solution was left so soak into the tiles for about twenty minutes before being scrubbed in with a black scrubbing pad fitted to a rotary floor buffer. At this point I also ran a stiff grout brush along the grout lines to get those clean as well.

The now soiled cleaning solution was rinsed with water and mopped off the floor. Any stubborn marks were then retreated using the same process and when I was happy that the floor was clean the floor was given a thorough rinse to remove any trace of cleaning product.

Having removed the old sealer and cleaned the tile and grout the next step was to apply a new sealer however the tiles needed to be dry to do. I decided therefore to seal the floor the following day and left an industrial air mover in place overnight to help dry out the tiles.

Sealing Terracotta Floor Tiles

Returning the next day to seal the floor I checked the floor first to make sure it was dry. All was well, so I proceeded to seal the floor starting with a base coat of Tile Doctor Colour Grow which is an impregnating sealer that soaks into the pores of the tiles, protecting them from within whilst simultaneously enhancing the colours in the tile.

Terracotta Tiled Floor After Clean and Seal in Bishop Stortford

Once the Colour Grow had dried I followed up with three coats of Tile Doctor Seal and Go Extra which like Colour Grow is a fully breathable sealer that lets moisture rise through the floor. Colour Grow however is a Matt sealer whereas Seal and Go adds a gives the floor a nice sheen.

Terracotta Tiled Floor After Clean and Seal in Bishop Stortford


Terracotta Floor Tile and Grout Cleaned and Sealed in North Kent

Terracotta Tiled Kitchen Floor Clean and Seal in Bishop Stortford Read More »

Slate Tiles Before and After Restoration in Thaxted

Lustre Restored to Dirty Slate Tiles in Thaxted

The single most important thing you need to do after having a new natural stone floor installed is to seal the tiles. The sealant acts as a barrier of protection for the stone against ingrained dirt, so without it the floor will become very difficult to keep clean.

This is the exact problem faced by my recent customer, who lives in the town of Thaxted in North Essex. Thaxted is a very historic place with over 1000 years of history and several fantastic medieval houses. The Slate kitchen tiles in the property had not been sealed after installation and, despite Slate being naturally durable and hard wearing, the tiles had quickly become dull and difficult to keep clean.

Despite valiant efforts at a DIY restoration, the customer required our professional assistance with deep cleaning and sealing the tiles to restore them back to their best condition.

Slate Tiled Floor Thaxted Before Cleaning

Cleaning a Dirty Slate Tiled Floor

To begin the cleaning process, I applied Tile Doctor Remove and Go across the floor and scrubbed it in using a slow speed rotary machine fitted with a scrubbing pad. Remove and Go is a multi-purpose product: it strips away any old sealer, adhesive and paint stains, and draws out ingrained stains and removes heavy soil build-up. The resulting slurry was then removed using a wet-vac machine.

Next, I focused my attention on the dirty grout lines, treating them with a strong solution of Tile Doctor Pro-Clean which was then scrubbed in along the grout line using a stiff brush.

There was still evidence of some grout haze on the stone following installation some years back so the floor was then treated to an acid wash using Tile Doctor Grout Clean-up which is a concentrated phosphoric acid cleaner designed to life grout smears haze (smears).

Once done I pressure washed the floor using a specialised spinning tool which blasts the tiles and grout with water to remove ingrained dirt from the most difficult-to-reach areas in the stone. The water is subsequently vacuumed back into a holding tank in my van without causing any splashing or overspill.

Sealing a Slated Tiled Floor

The customer was keen for the restoration to be finished within the space of a single day, so I installed a few Dri-Pod floor dryers to get the floor dry and ready to be sealed in no time. We typically leave at least 24 hours for these types of floors to dry naturally, but in this scenario the floor dryers were able to remove any excess moisture.

To complete the restoration, I applied four coats of Tile Doctor Seal and Go Extra to the floor to seal it. This a special acrylic-based sealer that protects the stone and allows for moisture vapour transmission. The makes it ideal for situations in which no damp proof membrane has been installed.

The addition of the sealer gave the floor a beautiful lustre – as you can see from the photos below – and will make the floor much easier to keep clean in the future. After months of difficulty, the customer was over the moon that the floor had finally been restored to its peak condition.

Slate Tiled Floor Thaxted After Cleaning


Professional Restoration of a Dirty Slate Tiled Floor in Essex

Lustre Restored to Dirty Slate Tiles in Thaxted Read More »

=================================

North Essex Tile Doctor

================================= Read More »

Scroll to Top