tile cleaning

Ceramic Bathroom Tile and Grout Renovation Colchester

Ceramic Bathroom Tile and Grout Renovated for New Colchester Homeowners

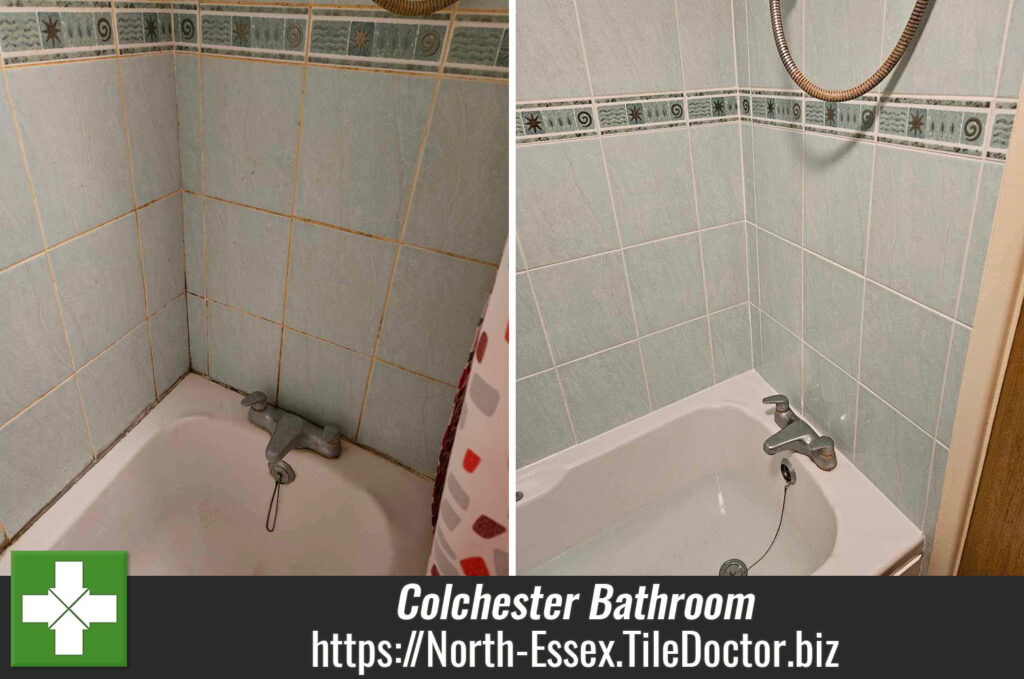
This fine example of a Ceramic tiled bathroom is from a house in the city of Colchester. The property had just changed hands and the new owner didn’t know how to restore the tile, grout, and silicone to their standards. It was clear that the tile and grout had been neglected by the previous owner and mould had started to form.
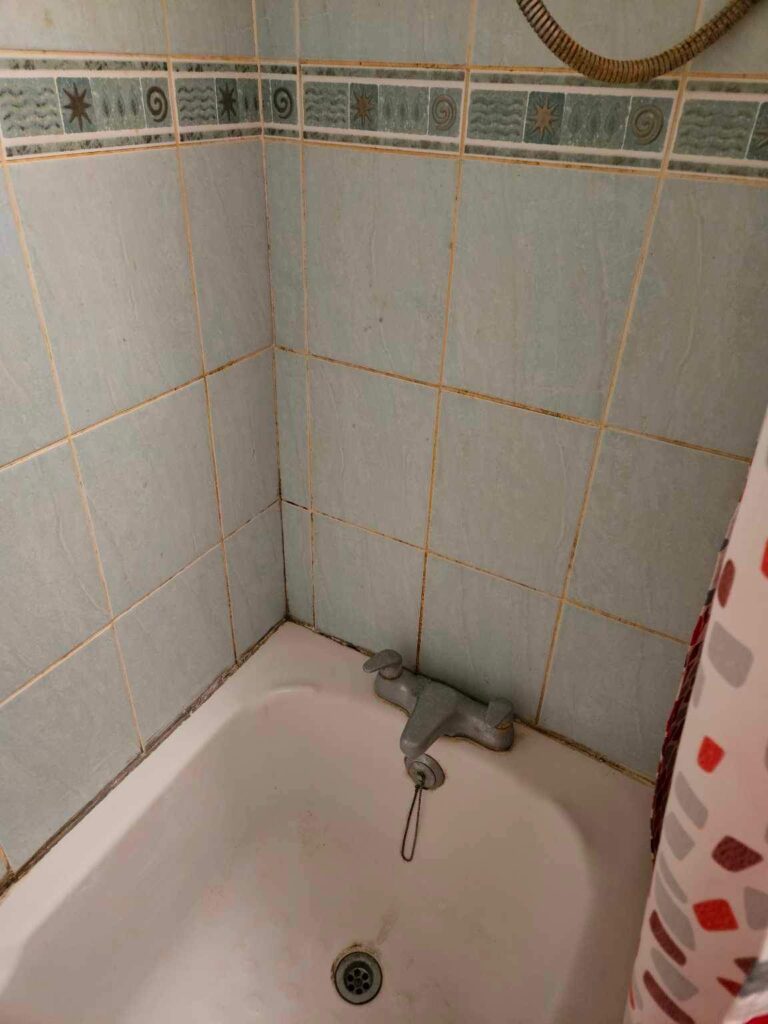
Ceramic Bath Tile and Grout Before Cleaning Colchester

Refreshing stained tile and grout is such a quick thing to do and gives maximum benefit, especially if your selling a property as it will help achieve more interest. So, it always surprises me that many sellers don’t chose to do this before putting their house on the market.
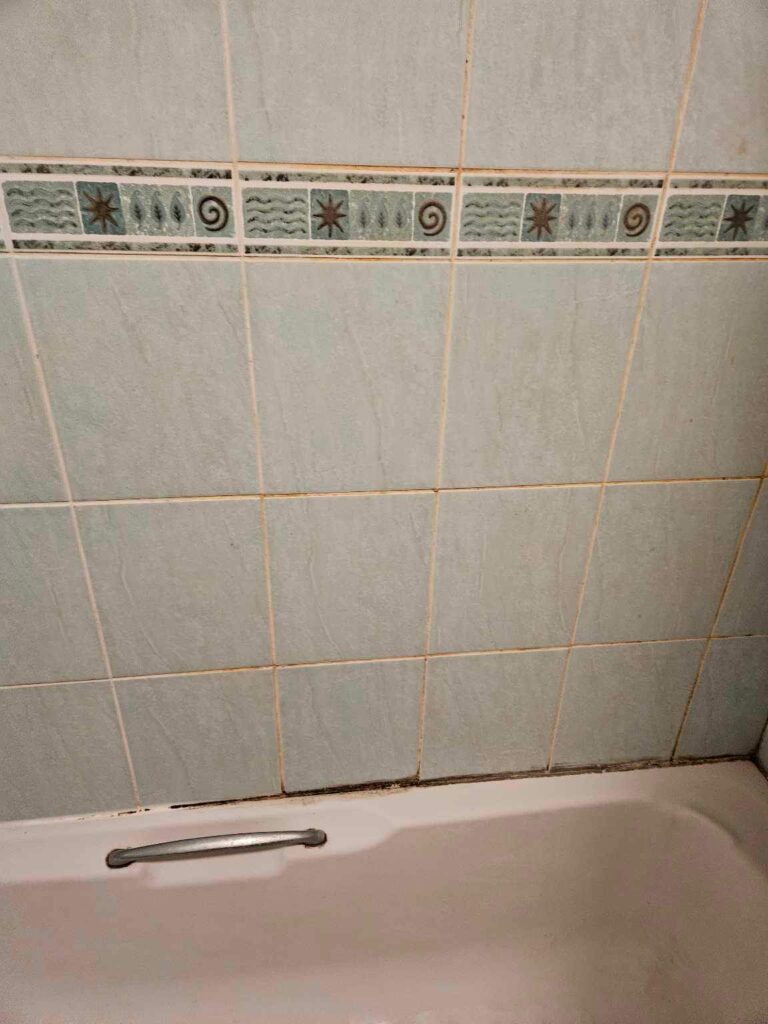
Ceramic Bath Tile and Grout Before Cleaning Colchester

Cleaning a Ceramic Bathroom Tiles

Work started with a deep clean of the grout lines with a generous application of Tile Doctor Duo Clean which is a fast and effective grout cleaner and mould remover. This product is designed for this purpose and comes with a trigger attachment so it can easily be sprayed onto the wall. The solution was then left for five minutes before being scrubbed into the wall tile and grout with a scrubbing brush. This action brought out a lot of dirt and staining from the grout which was then rinsed off.

After reviewing my handywork I decided more work was needed to the grout so I followed this up with an application of Tile Doctor Oxy-Gel. This is a gel cleaner that sticks well to vertical surfaces allowing for longer dwell times. After ten minutes it was worked into the grout as before and then rinsed off.

The Tile and Grout was now as clean as it could be but there were some deep-seated stains in the grout that simply couldn’t be removed. However, I always knew this could be the case and had already agreed I would apply a grout colourant if this proved to be the case.

Grout Colouring Ceramic Bath Tiles

Before applying the colourant though I needed to prepare the grout to achieve a stronger bond with the colourant. I did this with another Tile Doctor product called Acid Gel which is applied as before. This etches the grout at a microscopic level and being acidic further cleans the surface by removing limescale deposits.

I then set about stripping out the silicone mastic sealant between the bathtub and wall tiles with a sharp knife; the sealant was heavily stained almost black in places so very much in need of replacement. Once all the rubbish was swept out, I dried any remaining dampness from the grout and tiles.

This left the grout ready to be recoloured. I did this over the course of a few hours, using a White colourant from the Tile Doctor Grout Colourant range. White is just one of eleven colours available in the range and was chosen in this case to give the grout a really fresh look and to blend in with the Ceramic tiles. The Grout Colourant not only colours the grout joints – it also seals and rejuvenates them leaving it looking new.

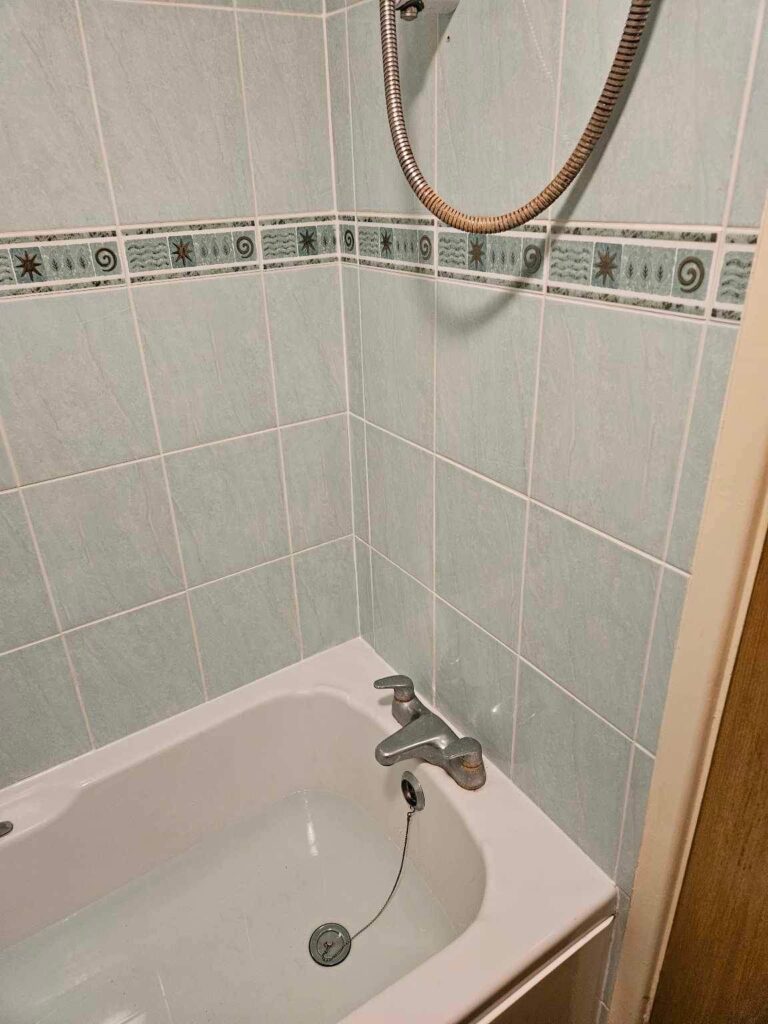
Once the restoration was finished, I filled the bath with water and resealed the shower base with fresh silicone mastic again in White to match the tile and grout. This last step finished the renovation leaving it looking like a new installation.
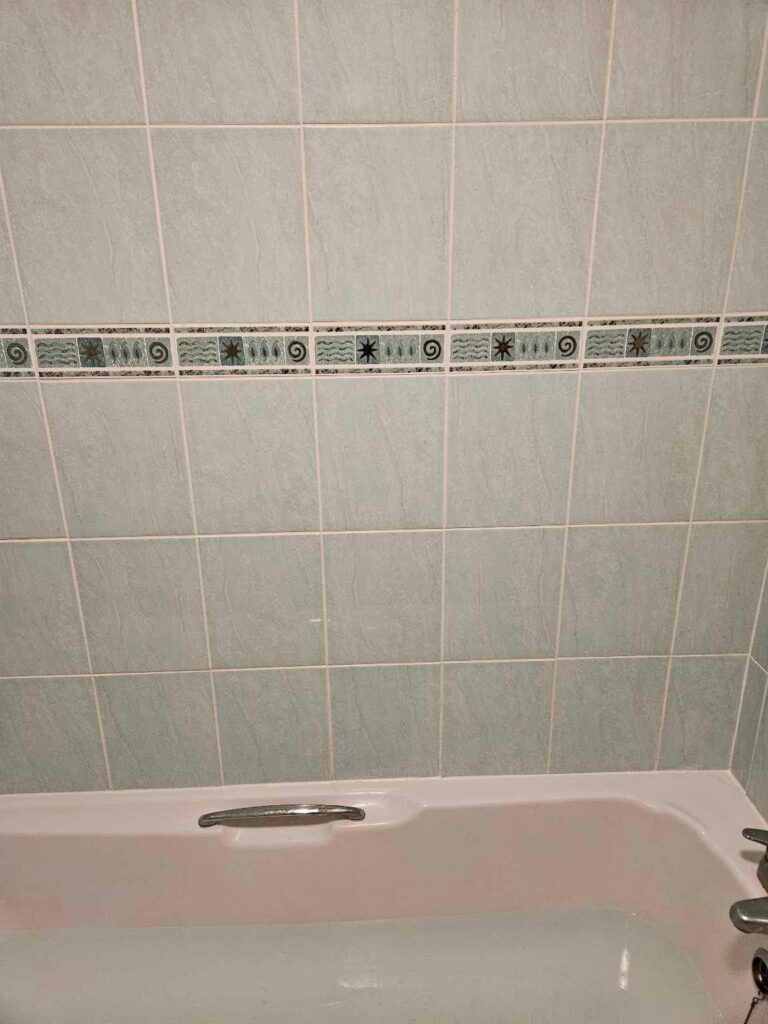
Ceramic Bath Tile and Grout After Cleaning Colchester

The Customer was amazed by the transformation of their bathroom and left the following five-star review.
Dean did an excellent job of getting the mould off my bathroom tiles and re-grouting them. It’s like having a new bathroom! I’m very grateful and would highly recommend North Essex Tile doctor. Georgina D, Colchester

Ceramic Bath Tile and Grout After Cleaning Colchester


Ceramic Tiled Shower Cubicle Cleaning and Grout Recolouring in Derbyshire

Ceramic Bathroom Tile and Grout Renovated for New Colchester Homeowners Read More »

Textured Porcelain Tile Cleaning in Chelmsford

Textured Porcelain Tiles cleaned in Chelmsford

“Our Porcelain tiles are unclean-able, please help”
We are always happy to help someone in distress, and this was the opening sentence of a conversation between ourselves and a very distressed home owner in Chelmsford. Chelmsford is a London commuter town situated approximately 30 miles from London.

The tile in question was a Porcelain textured tile, the owners had tried to clean and maintain their floor but due to the nature of the tile, which was very textured and coupled with incorrect maintenance it had left the floor looking very dirty and unloved.

We visited the property to see how we could help. The floor was across a large area in a kitchen diner so was subject to heavy usage, it had been down for some time and the new owners had inherited it from the previous owners who apparently had also had no joy in getting it clean. The floor looked very tired and in need of some attention. We discussed with the client what could be done and agreed a price for the work, booking a date for the following week.

Cleaning a Porcelain Tiled Kitchen Floor

Fortunately, dirt and grease are no match for the power of Tile Doctor Pro-Clean, it’s a multi-purpose high-alkaline cleaner, stripper and degreaser that’s a very effective tile and grout cleaner. On this occasion I applied a strong dilution using two parts water and left it to soak into the tiles first.

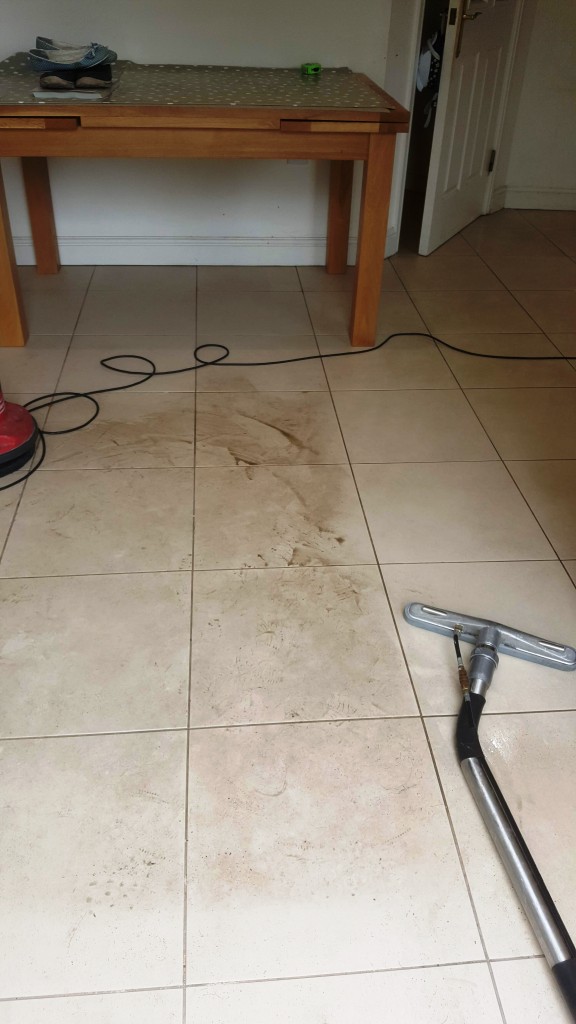
Working in areas of around 2 to 3 square meters at a time the solution was scrubbed into the floor using a rotary buffing machine fitted with a black scrubbing pad. We then rinsed the floor thoroughly with water and used a wet pick up vacuum to extract not only the dirt but also any product residue leaving the tiles clean and fresh.

Textured Porcelain Tile Cleaning in Chelmsford
Apologies on only taking one photo, I usually take more but it slipped my mind on this occasion, however if you look closely it clearly shows the difference the cleaning process was making. The client was very satisfied with the work carried out, they knew the floor should have looked a lot better than it had and now it finally looked clean!

Before leaving we explained how to maintain the floor and left a bottle of Tile Doctor Neutral Cleaner to keep the floor looking fresh. Tile Doctor concentrated Neutral Tile and Stone cleaner has been especially formulated for the regular cleaning of Tile and Grout.


Professional Clean of a Porcelain Tiled Kitchen Floor in North Essex

Textured Porcelain Tiles cleaned in Chelmsford Read More »

Terracotta Tiled Kitchen Floor Before and After Renovation Bishop Stortford Essex

Terracotta Tiled Kitchen Floor Clean and Seal in Bishop Stortford

We had a request to visit a beautiful Barn conversion on the Essex side of the market town of Bishop Stortford, the lady of the house was concerned about her Terracotta tiled Kitchen Floor which was dirty and had become difficult to maintain.

Terracotta Tiled Floor Before Clean and Seal in Bishop Stortford

After taking look I could see that the sealer had worn down and was no longer preventing dirt from becoming ingrained in the pores of the Terracotta tile. This is a common problem with Terracotta which needs a sealer in place if you want to keep the floor looking its best. I recommended we strip off what was left of the old sealer, give the floor a thorough clean and then re-seal it over the course of two days. As it turns out the floor had not been cleaned and resealed in ten years, so my client was happy for me to do the work.

Terracotta Tiled Floor Before Clean and Seal in Bishop Stortford

Deep Cleaning Terracotta Floor Tiles

The first step was to strip the floor off any remaining sealer using a strong dilution of Tile Doctor Pro-Clean. The solution was left so soak into the tiles for about twenty minutes before being scrubbed in with a black scrubbing pad fitted to a rotary floor buffer. At this point I also ran a stiff grout brush along the grout lines to get those clean as well.

The now soiled cleaning solution was rinsed with water and mopped off the floor. Any stubborn marks were then retreated using the same process and when I was happy that the floor was clean the floor was given a thorough rinse to remove any trace of cleaning product.

Having removed the old sealer and cleaned the tile and grout the next step was to apply a new sealer however the tiles needed to be dry to do. I decided therefore to seal the floor the following day and left an industrial air mover in place overnight to help dry out the tiles.

Sealing Terracotta Floor Tiles

Returning the next day to seal the floor I checked the floor first to make sure it was dry. All was well, so I proceeded to seal the floor starting with a base coat of Tile Doctor Colour Grow which is an impregnating sealer that soaks into the pores of the tiles, protecting them from within whilst simultaneously enhancing the colours in the tile.

Terracotta Tiled Floor After Clean and Seal in Bishop Stortford

Once the Colour Grow had dried I followed up with three coats of Tile Doctor Seal and Go Extra which like Colour Grow is a fully breathable sealer that lets moisture rise through the floor. Colour Grow however is a Matt sealer whereas Seal and Go adds a gives the floor a nice sheen.

Terracotta Tiled Floor After Clean and Seal in Bishop Stortford


Terracotta Floor Tile and Grout Cleaned and Sealed in North Kent

Terracotta Tiled Kitchen Floor Clean and Seal in Bishop Stortford Read More »

Terracotta Tiled Kitchen Cleaned and Sealed in Willingale

Terracotta Tiled Kitchen Floor Repaired, Cleaned and Sealed in Willingale

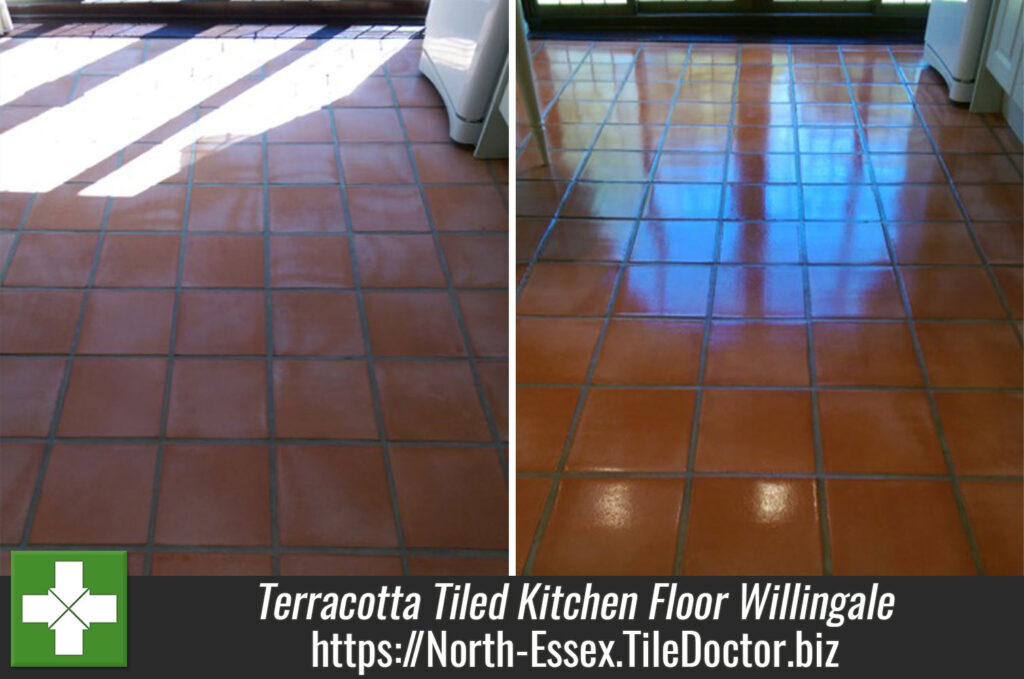
This Terracotta tiled kitchen in the village of Willingale near Maldon, in the Epping Forest District of Essex had lost its finish and looked slightly dull. The client wanted the tiles restored to a shiny finish and additionally wanted the two cracked tiles replaced in the kitchen doorway.

Terracotta Tile Replacement

I started by removing the two cracked tiles using an angle grinder and cleared away the grout to leave the edges of the remaining tiles as smooth as possible.

Terracotta Tiled Kitchen Replacement in Willingale Before Terracotta Tiled Kitchen Replacement in Willingale After

Cleaning a Dull and Dirty Terracotta Tiled Floor

The next stage was to strip and clean the tiles and grout lines. I dampened the tiles with water before applying Tile Doctor Remove and Go, a product which breaks down existing sealers so they can be scrubbed off the tiles and rinsed away. To make the work easier I used a rotary machine fitted with a black scrubbing pad to work the solution in and then pressure washed them using a spinner tool attached to a wet extraction machine mounted in my van. This process blasts any remaining dirt and sealer from the stone and grout lines and vacuums the waste into a holding tank in the van.

Terracotta Tiled Kitchen Repaired and Stripped in Willingale Terracotta Tiled Kitchen Repaired and Stripped in Willingale

This process took most of the day, but just before I left I replaced the broken tiles with two new ones and re grouted them in place, fortunately these tiles were still available and so it wasn’t difficult finding replacements. The tiles and grout were left to dry over night.

Sealing a Terracotta Tiled Floor

The following morning I damp tested the floor before beginning to seal the floor, this is an important check as damp can upset the sealer and lead to unexpected results.

Terracotta Tiled Kitchen Testing for Damp Willingale

Once I was satisfied the tiles were dry I applied five coats of Tile Doctor Seal and Go, leaving the stone with a healthy lustre. Seal and Go is a topical sealer that is highly recommended for Victorian, Terracotta and Quarry tiles and being water based it doesn’t leave a smell as it dries.

Terracotta Tiled Kitchen Cleaned and Sealed in Willingale Terracotta Tiled Kitchen Cleaned and Sealed in Willingale


Terracotta Kitchen Tiled Floor Maintained in Essex

Terracotta Tiled Kitchen Floor Repaired, Cleaned and Sealed in Willingale Read More »

Limestone tiles after cleaning Witham

Shine and Lustre restored to a Limestone Tiled Floor Witham

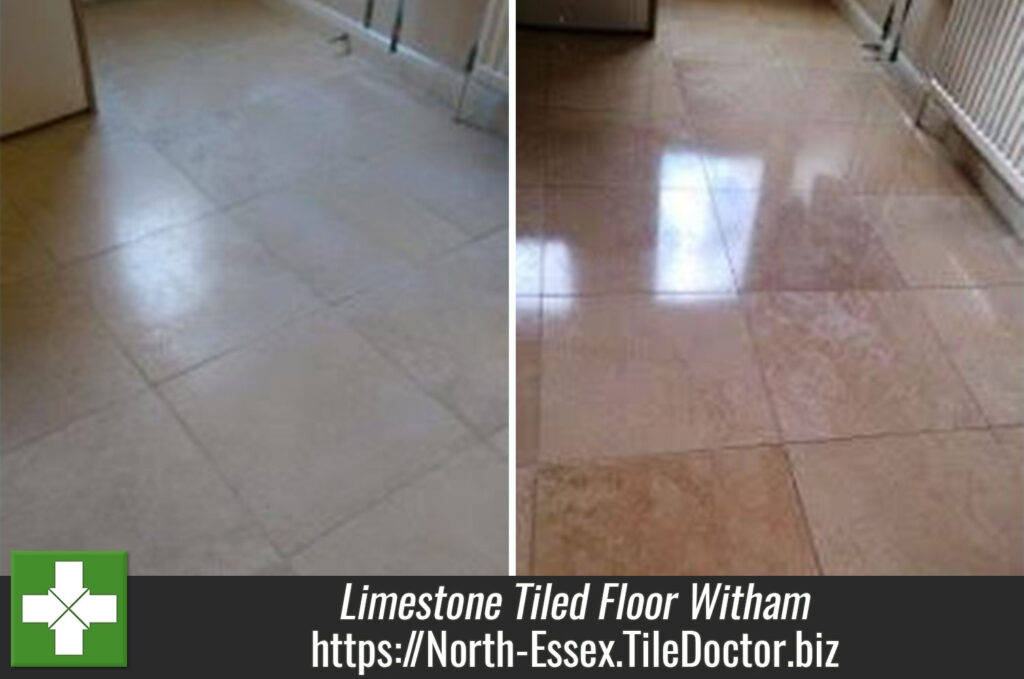
These Limestone tiles had been laid in a modern property in Witham, an Essex town that sits between Chelmsford and Colchester. The property owners had spent many hours over the years cleaning and sealing the floor to maintain its condition, but while the tiles were in certainly in good shape, they had lost their shine and lustre. The result was quite a dull looking floor that could certainly be improved on.

When the property owners contacted me about the problem, I informed them that due to the hardness of the stone only a process known as burnishing, which involves cleaning and polishing with special gritted pads instead of a liquid product, would do the trick to restore the Limestone tiles.

Burnishing a Limestone Tiled Floor

We use burnishing to restore several types polished stone to looking their best, including Limestone, Marble, and Travertine. Tile Doctor’s burnishing system consists of four diamond encrusted twister pads with varying levels of grit. The pads are graded so that each hones the stone to a greater degree than the previous one, resulting in the build-up of a durable polish and shine on the stone.

Using a small amount of water as lubrication, I worked my way through the system, applying each pad in succession, beginning with the Coarse grit pad, before on to Medium, Fine and Very Fine pads. While polishing the tiles, the diamond encrusted pads also serves to break down any dirt. Thankfully, these tiles were already well taken care off and were not currently suffering from heavy soil build up.

After completing the burnishing process, I promptly rinsed away any cleaning slurry and left the floor to dry.

Limestone tiles before cleaning Witham Limestone tiles after cleaning Witham

Sealing a Limestone Tiled Floor

I returned the property once the floor had dried completely to seal the tiles, with my choice of sealer being Tile Doctor Colour Grow. I applied three coats of the sealer to the tiles, before buffing them for a final time.

Colour Grow is an ideal sealer for Limestone for two main reasons. Firstly, it is an impregnating sealer, meaning it penetrates deep into the pores of the Limestone to provide robust protection against ingrained dirt. Secondly, it contains colour intensifying properties which enhance the natural colours in the Limestone.

I took a couple of photographs before and after (above) in which you can see a significant improvement in the shine and lustre of the Limestone tiles. Most of the cream and tan shades in the Limestone were practically invisible before the burnishing was carried out and a fresh seal was applied – now the tiles stand out as the most prominent feature of the room. Needless to say, the customer was very satisfied.


Restoring the appearance of a Limestone tiled floor in Essex

Shine and Lustre restored to a Limestone Tiled Floor Witham Read More »

Terracotta Tiled Floor After Cleaning in Halstead

Removing 20 Years of Dirt From a Terracotta Tiled Living Room in Halstead

The old town of Halstead, Essex, meaning ‘safe place’ or ‘place of refuge’ in Old English, was the site of this job. Similarly, historic is the property I was called to, a fantastic seventeenth century thatched cottage, situated just on the outskirts of the town.

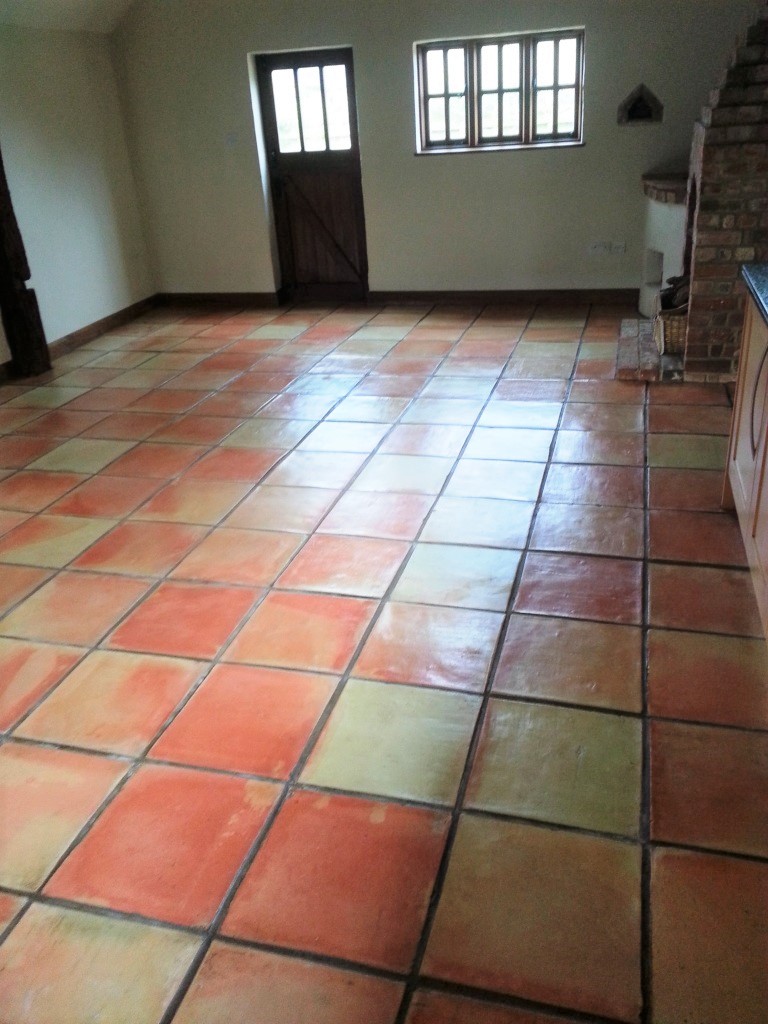
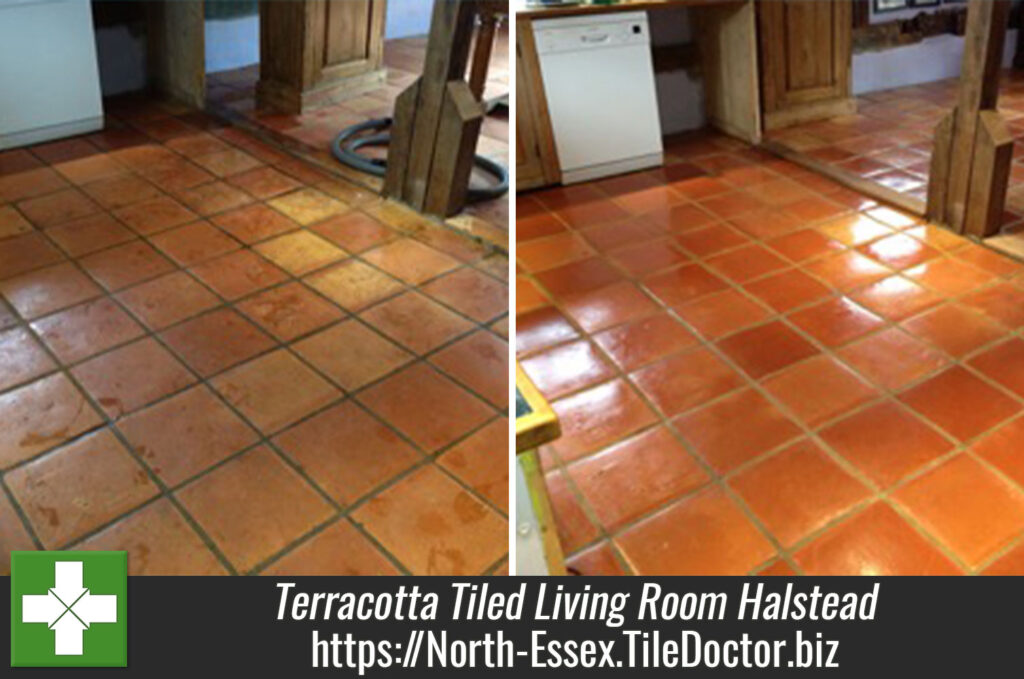
The owner was keen to have her Terracottatiled living room restored; the tiles had been laid twenty years prior and had been given very little treatment over the following two decades. They were now very dirty and dull looking and were certainly in need of a deep clean, followed by the application of a fresh seal to maintain condition.

Terracotta Tiled Floor Before Cleaning in Halstead

Cleaning a Dull and Dirty Terracotta Tiled Floor

To begin the cleaning process, Tile Doctor Pro-Clean, a heavy duty, high alkaline product designed for cleaning Terracotta and many other types of natural stone, was applied liberally to the floor in a dilute form. The product was then left to dwell for a short period, allowing it to seep into the pores of the stone, before being scrubbed into the tiles using a rotary machine fitted with a black scrubbing pad.

The grout lines should usually be treated individually in the cleaning process since the dirt and stains found here can prove very stubborn, and so they were scrubbed carefully with a special grout brush.

Following this a high pressure spinning tool, which is powered by a machine in my van, was used to blast stubborn ingrained soils from the grout and tile. This tool also serves to rinse the tiles and vacuum all slurry and chemicals back into a waste tank on the van.

The floor was then left to dry fully overnight, allowing for any excess moisture to disappear and leaving the tiles ready to be sealed the following day.

Sealing a Terracotta Tiled Floor

In the morning I arrived back at the property and promptly for any dampness. Once satisfied with the condition of the tiles, I proceeded to apply Tile Doctor Seal and Go. This is an odourless, water-based topical sealer that builds up protection on the surface of the tiles, providing a durable and aesthetically pleasing satin finish.

Terracotta Tiled Floor After Cleaning in Halstead

Since Terracotta is a very porous material, I was required to apply five coats of the sealer, allowing enough to fill the pores completely to offer protection from within.

The results of the restoration were very pleasing for both the customer and myself. I think you will agree that the floor no longer looks like it hasn’t been cleaned for twenty years – in fact, it looks almost brand new!


Deep Cleaning a Badly Maintained Terracotta Tiled Living Room in Essex

Removing 20 Years of Dirt From a Terracotta Tiled Living Room in Halstead Read More »

Scroll to Top